


Never Miss a Beat: Get a snapshot of the issues affecting the IT industry straight to your inbox.
Are all those Windows Vista User Account Control warnings driving you nuts? Here are seven ways to make Vista's UAC less intrusive, while keeping legitimate security threats at bay.
18 Min Read

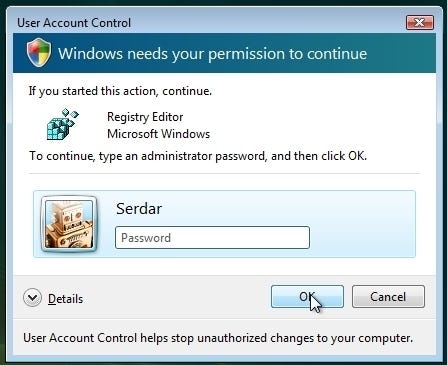
"Boop." Windows needs your permission to continue.
Is there any feature of Microsoft Windows Vista more universally reviled than the User Account Control, or UAC for short? It's a necessary evil at best, and a hideous inconvenience at worst.
Or, to take a more moderate stance, it's a feature the likes of which have been badly needed in Windows for some time now -- a way to moderate administrative user access so programs that don't need administrative access don't get it.
I take the second view, but I know there are plenty of people who take the first one, and I don't blame them. Aside from disrupting a good many existing work habits, there are also questions of how programs behave, or ought to behave, under UAC.
It's tempting to just turn off UAC and be done with it, but I'm not convinced this is a worthwhile solution. There are times when you'll want the protection that UAC affords, and there are ways you can make UAC a lot friendlier and less intrusive. Work with it rather than against it, and you may be pleasantly surprised at how manageable it really is.
1
Slow An Overzealous UAC
| |
| |
The first thing worth talking about is under what circumstances the UAC dialog should and should not show up. One complaint I've heard from many people is that UAC bugs them to do something for what seems like a perfectly ordinary system action, like opening a file or copying something somewhere. This isn't how UAC is supposed to work, so here's a quick rundown on when you should and shouldn't get UAC prompts.
First, UAC should trigger whenever you click on any Windows icon or dialog that has the "shield" logo. The shield logo was created as a visual cue that any action involving that item will require UAC approval, giving users some degree of forewarning. These include things like application installers, which obviously need to have admin permission to do their thing. You've probably noticed by now that app installer icons have a little shield logo emblazoned on them; that's another visual cue to indicate you need UAC approval to run them.
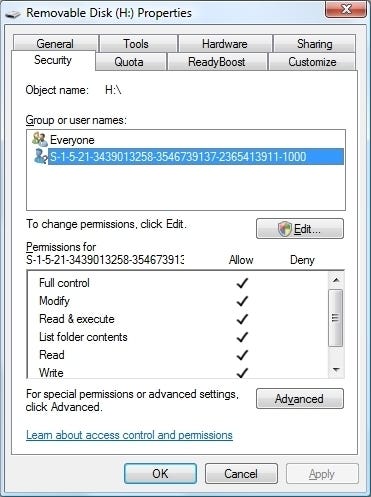
UAC should not trigger when you open documents in your user directory, when you access documents on another drive that you know is yours, or when you run regular workaday programs like Office or Firefox that don't require administrative permissions to work properly. If that happens, then there's a strong chance the permissions controls on those files are damaged or misconfigured.
One such situation often occurs when working with files on a hard drive that was migrated from another computer, such as one running a previous version of Windows. A drive formatted as FAT or FAT32 won't show such issues since those file systems don't use permissions, but an NTFS-formatted drive may have the ownership on its files and directories set to a user that doesn't exist on your current system. As a result, any file operations on that drive have to be done in admin mode, and may fail even then. The solution is to re-take ownership of everything on the drive, either as the current user or an administrator. This can be done through the GUI, but it's often faster and more flexible to do it through an elevated command prompt. If e: is the drive in question, you can use the ICACLS command, like so:
Icacls e:\* /setowner Administrators /T /C
Note that this command may take a while to finish, since it has to iterate through every object in the file system and apply the security changes. You may also want to manually remove the Recycle Bin from that drive after you do this, since it might not function correctly after a permissions or ownership change. This also can be done from an elevated command prompt:
attrib -s -h e:\RECYCLER
rd /s e:\RECYCLER
(again assuming that e: is the drive in question). The Recycle Bin for that drive will automatically be recreated the next time you restart the system. You may also need to explicitly assign permissions for that drive to allow proper access to everything in it, but ownership is paramount.
2
Use Process Explorer
| |
| |
Now for the next question: Is it possible to launch certain programs as elevated without having to deal with the UAC prompt? The short answer is yes, although there are many roads to that particular Rome. The exact road you'll take depends on your work habits and how much you want to modify them.
One method I use to avoid UAC is to run a replacement for the Task Manager, Sysinternals.com's spectacular Process Explorer. When you invoke PE with the /T command line option, it launches the program as Administrator. I placed a shortcut to PE in the Startup group, and after logging in I'm greeted with a UAC prompt to run the program administratively.
So where's the workaround, you ask? Well, once PE has been launched as admin, one of the things you can do is use it to launch other programs as admin. I do this through the program's File / Run dialog, which also has a history function and can be used to store many common admin tasks, like launching a CMD session or running COMPMGMT.MSC /S (the Computer Management console). All of those programs will run as admin, with no UAC dialog box.
Obviously PE is not the only program that can be invoked in this fashion to launch other programs administratively, but it's one of the better ones for a variety of reasons -- not the least of which is it was written as a replacement for a system component, so it's ostensibly a solid piece of code that won't fall over on you.
This method has a few limitations, most of them revolving around what's most comfortable for the user. The biggest disadvantage is that it's not very ergonomic, for lack of a better word: to invoke PE you need to open it up from the system tray (or by pressing Ctrl-Shift-Esc), then open the Run menu (Ctrl-R), then type what you're looking for or scroll down to find it. It's fine if: a) you leave PE running constantly, as I do, and b) you only need to invoke an app as admin every so often. Consequently, you may feel there's probably a better way to do this, and sure enough, there are a few.
3
Schedule A Task To Run As Admin
The single sneakiest way to pull an end run around UAC is to launch a task as admin through the Task Scheduler. Since you can't launch the Task Scheduler and add a task as admin without being admin (and without going through UAC) in the first place, this isn't as big a loophole as it sounds. The needed admin credentials are stored with the task itself.
Once set up, it can be used to either run individual tasks (safer) or as a general framework for launching administrative tasks (slightly less safe, but more convenient).
Here's an example for how to create an administrative command prompt in this fashion.
| |
| |
Log in as an administrative user and start the Task Scheduler. One quick way to get there is by typing sched in the Start Menu, and then clicking on Task Scheduler when it appears. It's also available in the Control Panel, under "Schedule tasks" in the left-hand pane in the default view, or in Administrative Tools in the Classic view.
Create a new task by clicking "Create Task" in the Actions pane. ("Create Basic Task" may not give you all the options you need.)
In the General tab, set a name for the task. "Admin" works well. Any name will do as long as you can remember it easily; you're going to need it later. Select the "Run with highest privileges" checkbox.
In the Actions tab, click "New" and select "Start a program." Supply the path to the program you want to run as admin. In this case it's cmd.exe. Click OK to add that action to the list.
In the Conditions tab, uncheck all the options listed.
In the Settings tab, uncheck all the options listed, except for "Allow task to be run on demand"; that option needs to be checked.
Click OK to add the scheduled task.
To invoke the task, create a shortcut that points to the following location:
C:\Windows\System32\schtasks.exe /run /tn "<task name>"
<task name> is the name you chose back in step 3. The quotes around the name are generally required. You can also set an icon that emphasizes that this is an admin operation; I prefer to use the yellow warning sign.
Launch the shortcut. You should see a CMD window with the text Administrator: taskeng.exe in the title bar.
One of the little tweaks I did for an admin CMD window was to set the background color for the window to a dark red so that I could tell at a glance if I was typing in a regular or elevated command window. To do this, launch the admin CMD window, press Alt-Space to open the window's menu, and select Properties. Under "Colors," select the color scheme you want to use with the admin window, and click OK.
This same technique can be used to launch an elevated instance of Explorer as well. Use explorer /separate to launch Explorer in a separate instance, so that it'll elevate correctly -- otherwise, it'll just launch as another window in the same instance as the existing Explorer process, which is generally not elevated. (Be really careful with elevated Explorer instances, since you have the power to totally mess things up this way.)
Also, if you launch an elevated Explorer instance, keep in mind that you cannot copy or move files between elevated and non-elevated instances of Explorer. If you’re trying to copy stuff into or out of the Windows directory, for instance, launch the elevated Explorer as above, then press Ctrl-N to open up a second window from that instance so you can copy between them. It's also possible to use the Task Scheduler as a generic way to launch an application administratively. What's more, there's already a proof-of-concept example available for how this can be done, one that is about as convenient as something like this could be made.
Programmer Martin Zugec has a tutorial for how to use the Task Scheduler to create a script that can be used to elevate anything without a UAC prompt, through a right-click context menu.
Titled SkipUAC, it uses both a scheduled task and a task-running application to accomplish its magic. Note that you need to be able to run tasks as an administrative user to install this program in the first place, and that the quality of the whole thing is very alpha -- it's intended only for people who really know what they're doing.
4
Use UAC's "Quiet Mode
One not very broadly documented UAC feature is something called "quiet mode," where UAC elevation can be set to happen silently without needing user approval. Programs that need elevation still run in a separate security context, and the user still runs by default with reduced privileges.
| |
| |
Quiet mode isn't made available by default through Vista's UAC management controls, probably because it has the potential to be abused. Turn it on, and programs that ask for elevated privileges from the system can run without explicit user approval. Still, it's a useful way to temporarily speed up a lot of operations that require elevation if you aren't using an elevated shell instance.
To invoke quiet mode manually, you'll need to edit the Registry (a UAC action). Set the DWORD values:
HKEY_LOCAL_MACHINE\SOFTWARE\Microsoft\
Windows\CurrentVersion\Policies\System\
ConsentPromptBehaviorAdmin
and
HKEY_LOCAL_MACHINE\SOFTWARE\Microsoft\Windows\
CurrentVersion\Policies\System\ConsentPromptBehaviorUser
to 0 (the default is 2). You may need to do a policy refresh after this, by using the gpupdate command from an elevated command prompt.
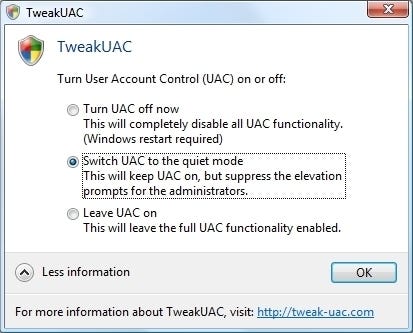
Another way to toggle quiet mode is through the use of third-party freeware tool TweakUAC. TweakUAC lets you either disable UAC completely (which requires a reboot), reactivate it, or put it in silent mode on demand.
5
Turn Off The Secure Desktop
One of the features -- or irritations, depending on how you look at it -- of UAC is how the UAC prompt itself is launched on a completely separate, secure desktop. That’s why the screen darkens for a second and the UAC prompt appears on top of a grayed-out version of your desktop (which you can no longer interact with). This keeps everything but you, the user, from interacting directly with the UAC prompt, so a malicious program can’t activate UAC in your stead.
What annoys most people about the Secure Desktop is that it can take several seconds to kick in, especially if you’re on a machine that doesn’t have the fastest video hardware or which isn’t using the Aero interface. My notebook, for instance, has a middling graphics processor that doesn’t work with Aero, and so the UAC prompt can take a couple of seconds to actually appear.
It is possible to disable the Secure Desktop and make the UAC prompt appear that much more quickly on your main desktop. To toggle Secure Desktop, edit the Registry, and set the DWORD value:
i>HKEY_LOCAL_MACHINE\SOFTWARE\Microsoft\Windows\CurrentVersion\Policies\
System\PromptOnSecureDesktop
Set this to 1 to turn on Secure Desktop, and 0 to shut it off. You might need to run gpupdate /force after you do this to make sure the changes take effect.
I should point out that if you’re uncomfortable with the idea of sacrificing that much security for the sake of a little speed, don’t turn off the Secure Desktop; you might be better served by one of the above options instead.
6
Tighten Up UAC's Control
With all of the discussion I’ve given here about how to make UAC a little easier to use, I should also throw in a tip that may be useful to those who want UAC to be more secure. By default, UAC forces a non-admin user to type in an admin password, but allows an admin user to simply click OK to consent to a UAC action. That said, it’s also possible to force UAC to prompt for a password for all users, including admins.
To do this, edit the Registry, and set the DWORD value:
HKEY_LOCAL_MACHINE\SOFTWARE\Microsoft\Windows\
CurrentVersion\Policies\System\ConsentPromptBehaviorAdmin
to 1. The default value is 2, which is the standard admin behavior. (Click to consent.)
| |
| |
7
Enforce Running Signed Code
Here’s another security-enhancement tip that may be useful to people who want to run UAC silently, but still want some additional protection against potentially spurious code.
UAC can be set to run programs as admin only if they have a valid digital signature, although by default this feature is turned off. Most program installers have some kind of signature; you can find out if a given app has a signature by right-clicking on the program’s icon, selecting Properties, and looking for the Digital Signatures tab. This is another bit of insurance that the program you’re running is not malicious and has a pedigree of some kind.
To make sure that UAC elevates only signed code, edit the Registry and set the DWORD value:
HKEY_LOCAL_MACHINE\SOFTWARE\Microsoft\Windows\CurrentVersion\
Policies\System\ValidateAdminCodeSignatures
to 1. This change should take effect immediately.
Keep in mind there may be many perfectly innocuous programs that aren’t signed and will fail if you try to run them as admin with this feature turned on. If you get an error that says “A referral was returned from the server,” that’s a sign that the program you’re trying to elevate isn’t signed. (This is probably why this function was disabled by default, since it would cause a lot of garden-variety software to not work.)
That said, if there’s something you know is valid and you want to run it as admin, you can do so by running it via an elevated command prompt, Explorer instance, or through the Process Explorer trick mentioned previously.
About the Author(s)

Follow Serdar Yegulalp and BYTE on Twitter and Google+:
 Twitter @syegulalp @BYTE
 Google+ Serdar Yegulalp on Google+
You May Also Like
More Insights
Editor's Choice


May 2, 2024
While there are plentiful options in cyber resiliency and business continuity tools and platforms, there isn’t one that can knock out everything from sudden cloud outages to prolonged ransomware attacks in a single punch. What can you do to keep the company on its feet no matter what is thrown at it? Find out in this new virtual event.
Reserve Your Seat Now