

Never Miss a Beat: Get a snapshot of the issues affecting the IT industry straight to your inbox.
Want to test drive the Windows 10 Technical Preview without screwing up your computer? Windows 8.1's built-in virtualization technology makes it easy.
8 Min Read

8 Biggest Tech Disappointments Of 2014
8 Biggest Tech Disappointments Of 2014 (Click image for larger view and slideshow.)
If you got a laptop or other device for Christmas that came with Windows 8.1 installed, chances are you're still getting to know your gadget and the operating system, and Windows 10 is not even on your radar. Then again, it might be: More than 1.5 million people already have signed up to try Microsoft's Windows 10 Technical Preview. That number is likely to rise in January, when Microsoft has promised to release a significant new Preview build.
If you're the type who does like to live on Microsoft's bleeding edge, you might already be scoping out how to install the Windows 10 Preview on your new device -- without hurting it. But is that even possible? Microsoft has cautioned from the start that users should not install the Preview on production machines. A handful of significant bugs, including one that nuked File Explorer functionality, have testified to the risks.
Luckily for Windows 8.1 users, Win 8.1 includes almost all of the same Hyper-V virtualization technology found in Windows Server. That means rather than simply installing Windows 10 Preview in place of Windows 8.1 -- and accepting the attendant dangers -- you can use a virtual machine (VM) to run it. With Windows Preview 10 running in a virtualized environment that's sandboxed from the core system, any problems should not propagate to the host OS.
Not every Windows 8.1 user can use Hyper-V, unfortunately. There are a lot of device requirements: a 64-bit version of the Pro or Enterprise versions of Windows 8.1; BIOS-level virtualization support; and a 64-bit processor with support for Second Level Address Translation (a.k.a. SLAT, a CPU-level enabler of hardware virtualization that's found in the majority of recent chips). You'll also need at least 20 GB of free disk space and at least 4 GB of RAM. In other words, if you're reading this on a Surface Pro 3 your hardware probably has the chops, but if your new rig is a $200 Windows 8.1 tablet, don't get your hopes up.
Figure 1: 
But if you have the necessary hardware and want to explore Windows 10 without living dangerously? Hyper-V is an outstanding, fairly straightforward option. Here's everything you need to know to install the Windows 10 Technical Preview using Windows 8.1's built-in virtualization.
Step 1: Ensure Hyper-V is enabled
Before you can install the Windows 10 Technical Preview, you have to create a VM to house it. Some manufacturers enable hardware virtualization by default in some devices. Microsoft does this with the Surface Pro 3, for example. If your device isn't pre-configured for Hyper-V, here's how to activate the feature.
1. Open the Charms menu by swiping from the right edge of the screen on touch devices, or by pressing the Windows key + C if you're using a machine with a physical keyboard.
2. From the Charms menu, select "Settings," then "Change PC Settings."
3. In the PC Settings menu, select "Update and recovery" from the left
column. Then, in the subsequent screen, select "Recovery," which you'll find in the left pane.
4. Select "Restart now" from the field on the right, below the "Advanced startup" heading.
Figure 2: 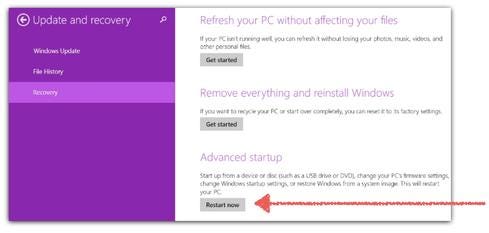
5. Wait for the boot menu to load. Once it does, choose "Troubleshoot."
6. In the following menu, select "Advanced options," then on the next screen choose "UEFI Firmware Settings."
7. Select "Restart" and wait for the BIOS menu to load. Once it does, verify that hardware virtualization support is enabled in the BIOS settings.
8. Save any changed settings and reboot the machine. Once you've done so, activate the Charms menu again, but this time, select the Search Charm. Enter "turn windows features on or off" into the search field, and then select the item with this title from the search returns. This action launches the Windows Features menu, which you can also access via the Control Panel by right clicking or hold-tapping the Start button, then selecting "Programs," then "Programs and Features" and finally, "Turn Windows features on or off."
9. In the Windows Features menu, confirm that the box to the left of "Hyper-V" is checked. If it isn't, check the box and reboot.
Figure 3: 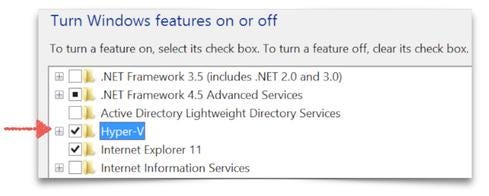
Step 2: Configure Hyper-V
Now that you've verified Hyper-V is enabled, you need to create a virtual switch for the Hyper-V environment.
1. Open the Search Charm. Next, type "Hyper-V Manager," then select this item when it appears among the search returns.
2. In Hyper-V Manager, locate the Actions panel, on the right side of the window. (You do not want the Action menu in the upper left.) In the Actions panel, select "Virtual Switch Manager."
Figure 4: 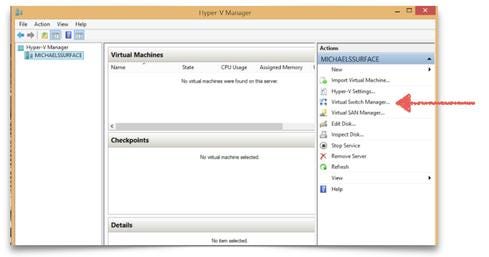
3. After the Virtual Switch Manager opens in a separate window, confirm that "External" -- rather than "Internal" or "Private" -- is selected in the main panel. External virtual switches are fairly flexible, permitting a VM to communicate with the host OS as well as with external systems. Internal virtual switches support communication with the host OS but not external systems. Private virtual switches permit communication only between the VM and an isolated network, but not with the host OS.
Figure 5: 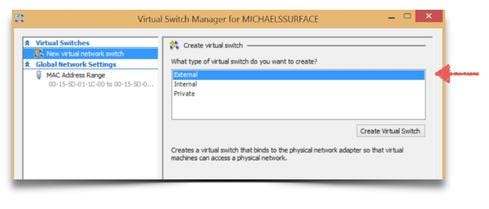
4. Select "Create Virtual Switch," then, on the following screen, name your newly-created VM, and click "OK."
Step 3: Download the Windows 10 Technical Preview and install it in a VM
Now that you've set up Hyper-V and created a VM, you can finally get down to the business of installing the Windows 10 Technical Preview. Go to Microsoft's Windows Insiders webpage and register for the Insiders program. After you've done so, you can download either the 32-bit or 64-bit Windows 10 Technical Preview ISO file. Once you've procured the ISO, complete the following steps.
1. Open Hyper-V Manager again, then open the Action menu in the upper left
(in other words, not the Action panel on the right that you used before).
2. From the Action menu, select "New," then "Virtual Machine."
Figure 6: 
3. A wizard for your new VM will launch. Select "Next" on the first screen (titled "Before You Begin") then, on the following screen, enter the name of the VM you created in Step 2.4. After you've typed the VM's name, select "Next."
4. On the next screen, which is labeled "Specific Generation," select "Generation 1." "Generation 2" is acceptable as well but is only advisable if you want to activate advanced features in the Preview, such as Secure Boot. Once you've chosen the appropriate version, select "Next."
Figure 7: 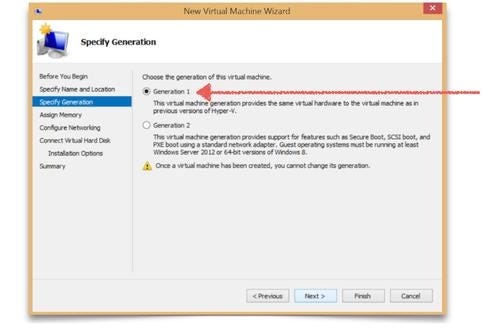
5. On the following screen, labeled "Assign Memory," allocate at least 2048 MB of memory to your VM by typing into the "Startup memory" field. Once you're done, select "Next."
6. On the subsequent screen, labeled "Connect Virtual Hard Disk," select "Create a virtual hard disk," which will be the top option listed in the main frame.
7. In the "Size" field, assign at least 20 GB of storage. Then select "Next."
8. On the next screen, labeled "Installation Options," select "Install an operating system from a bootable CD/DVD-ROM." Under the "Install an operating system from a bootable CD/DVD-ROM" heading, select the radio button for "Image file (.iso)."
9. On the same screen, select "Browse," which is located to the right of the "Image file (.iso)" button. Once the file-browsing window opens, locate the Windows 10 Technical Preview ISO file you downloaded at the beginning of Step 3. Then, select "Next."
10. On the following screen, labeled "Summary," confirm that the VM options listed in the "Description" field are correct, per the previous steps. If not, select "Previous" to move backward through the process and make any necessary changes. If the options are satisfactory, select "Finish."
11. Wait while the system prepares your new VM. Once the process is complete, right click or hold-press the listing for the VM you just created. You should find the listing under the "Virtual Machines" frame, above the "Checkpoints" frame and to the left of the "Actions" column.
12. From the right-click menu, select "Start." Your VM's "State" should change from "Off" to "Running."
Figure 8: 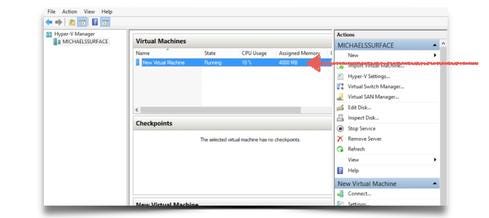
13. Right click or hold-press your VM's listing again. This time, select "Connect" from the right-click menu. After connecting, the VM will load in a new window.
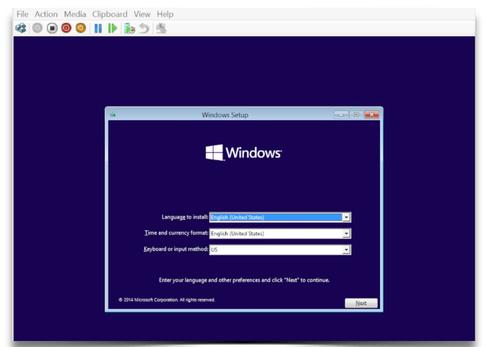
14. From here, you can install the Windows 10 Technical Preview in your new virtual environment.
Figure 9: 
About the Author(s)
You May Also Like
More Insights
Editor's Choice


May 2, 2024
While there are plentiful options in cyber resiliency and business continuity tools and platforms, there isn’t one that can knock out everything from sudden cloud outages to prolonged ransomware attacks in a single punch. What can you do to keep the company on its feet no matter what is thrown at it? Find out in this new virtual event.
Reserve Your Seat Now